Monday, April 27, 2009

Literacy-Enriched Play Settings

After reading Building a Foundation for Preschool Literacy by Carol Vukelich and James Christie, I've been thinking of ways to create what they call "literacy-enriched play settings". Simply put, these play settings provide materials for children to explore reading and writing while they play. While playing in a literacy-enriched play setting, children:
  • Learn why people read and write
  • Practice the conventions of reading and writing
  • See reading and writing as something they want to be able to do

I've made a few additions to our spring flower sensory tub and the girls are loving it! Next to the flower tub we now have a tub that holds a cash register, a wallet with pretend credit cards, two phones, a small notebook, a clipboard with plain paper, and a cup with pens and colored pencils.

To introduce the materials, I suggested to Julia that we set up a flower shop. While she was arranging some flowers I pretended to answer the phone and take an order from a customer. I asked the customer questions and wrote the order on a page in the notebook. Then Julia and I worked to fill the customer's order. Julia decided that I should pretend to be the customer and pick up the order. She rang up my order, swiped my card, and gave me a slip to sign my name. Soon Julia was answering her phone and writing down orders. In the picture above she is using the flower sign to help her spell "pink daisies". Another time I suggested that we make a sign for our flower shop and draw pictures of our arrangements to make advertisements. It only took a few suggestions and a little modeling from me for Julia to understand what to do.

Here Lauren is writing down an order. She doesn't write any letters yet but her writing is a series of lines that look similar to letters. By the way, what can be cuter than a little bumblebee working in a flower shop?

The girls will now play flower shop for over an hour! I spent about ten minutes to gather the materials for an activity that provides tons of fun and playful learning. By using this flower shop the girls:
  • Learn why people read and write- to remember a customer's order, to make a sign, to make an advertisement, to sign a credit card slip
  • Practice the conventions of reading and writing- write from left to right, use resources to help with spelling
  • See reading and writing as something they want to be able to do- for over an hour!!

I am so excited to try some more literacy-enriched play! I'm thinking we can try a restaurant, a pet groomer, a bakery, a pizza shop...

Friday, April 24, 2009

Additions to Ocean Writing Station

I found these great ocean themed shapes and stationary on storyit.com to add to our ocean writing station. Set your printer to landscape before printing.

Fish shape

Starfish shape

Ocean border

Thursday, April 23, 2009

Sensory Tubs

The girls have enjoyed two new sensory tubs. The spring sensory tub has a base of styrofoam covered with a thin layer of paper grass. A basket holds several silk flowers, small pots with foam and paper grass, and flower cards on dowel rods.

The girls pretend to plant the flowers by poking them into the styrofoam. They can use the flower cards to label their rows of flowers. I am planning to add a few more materials to this tub to make it a more literacy rich play set. I'll write a follow-up post when I'm done.


The ocean sensory tub is simply a tub of water and plastic ocean animals. This tub combines the sensory experience of splashing in water with exploration and imagination. As the girls play with the animals they often act out what we have read about sea creatures. Such play allows them to gain mastery of new information. One day Julia pretended the octopus sprayed his ink to get away from a moray eel. Another time I heard her talking about one of the animals escaping from his enemy. Oral language develops as the children communicate using newly acquired vocabulary. This has been a popular activity that is as fun as it is educational!

Wednesday, April 22, 2009

Fish Mobile

After admiring the pictures of colorful fish in an old copy of Your Big Backyard the girls made these beautiful fish mobiles.

To make a fish mobile you need a paper plate, blue paint, sponges, scissors, fish shapes cut from construction paper, colored chalk, sugar, water, string, and tape.

1. Mix 1/3 cup sugar into 1 cup water and soak the chalk overnight in the sugar solution. Now the chalk will have bright colors that will not smear. I found this procedure in Preschool Art from Mary Ann Kohl.

2. Sponge blue paint on the paper plate. When the paint dries, sponge paint the other side of the plate.

3. Use the chalk to draw designs on both sides of the fish.

4. Cut the plate into a spiral.

5. Cut string into 8-12 inch lengths. Tape a string onto each fish and tape the other end of each string to the spiral. Hang your mobile and enjoy your beautiful fish!

Tuesday, April 21, 2009

Fish Pattern Blocks

I found these great pattern block fish cards at Prekinders.com. Five year old Julia uses the black and white cards and reproduces the fish on the floor or table. Two year old Lauren uses the color cards and places the blocks directly on the card.


Monday, April 20, 2009

Fish Song Chart

We've added I'm a Little Fishy to our song and poem charts. For an explanation of the charts please visit this post. We sang the song a few times while tracking the print with a pointer and then we did a few follow up activities.
The big girls played fishing for sight words. I cut several construction paper fish and on each fish I wrote a high frequency word from the song. I clipped a paper clip to each fish and made a fishing rod by taping a magnet to a string that I tied to a pencil. The girls took turns fishing for words.
After catching a fish, the child read the word and found it on the chart. We then read that line of text together. This game could also be played with letters written on the fish. The child would catch a fish, identify the letter, and find the letter on the song chart.
I also used the chart to practice the /sh/ sound. We read the word 'fishy' and noticed that the letters sh made the /sh/ sound. The girls have already been introduced to sh so this was a review. We used these cards from My Montessori Journey to practice reading sh words.
Finally, the girls enjoyed Jello fish bowls while I read Into the A,B, Sea by Deborah Lee Rose to them.

Friday, April 17, 2009

Ocean Writing Station

I've changed some of the materials in our writing station to go along with our study of ocean animals. It is amazing how a few new materials can renew a child's interest in a familiar activity. Along with the writing materials I have also set out a tub of several nonfiction ocean books. The girls can look through the books for inspiration for their writing.

The writing station holds a booklet containing several pages of ocean words and pictures that I downloaded from Kidssoup.
An envelope holds some pictures of ocean animals that the girls can glue onto a page and then write their story.
I've added story paper with a blank space at the top for drawing a picture and lines at the bottom for writing a story.
A mini clipboard holds sheets of blue paper. I have also provided blue flip books and white flip books. I am going to add some small stapled books with blue covers cut along the top to look like waves. This tray always sits on the playroom table. The girls can choose from a variety of materials including crayons, markers, pencils, scissors, glue, and hole punches. We also have a tray of white 8 1/2 by 11 inch paper on a nearby shelf.
Here Julia wrote about a sea turtle. Her writing says, "Daon at the bobdm" (Down at the bottom). I suspect she had more to say but ran out of room and decided to stop. Notice the number 8 on the turtle's back. The girls have been enjoying Somewhere in the Ocean by Jennifer Ward and TJ Marsh. Each page in the book has a hidden number and Julia incorporated that idea into her work.
Here she used story paper to write a shark fact after we read about sharks. Usually I do not write on a child's writing station work but (for some reason that I cannot remember) this time I did.

Thursday, April 16, 2009

Julia's DIY Birthday

Julia celebrated her fifth birthday this week! She made my life much simpler by requesting a family party. I thought it would be fun to let her do a lot of the party preparation and I was right!
First, Julia and I made her pinata. We tore newspaper into strips and used liquid starch to adhere the strips onto an inflated balloon. We covered the balloon with three layers of newspaper and let it dry for about 24 hours (the last few hours the balloon was hanging outside in the sunshine).
When the newspaper was completely dry we popped the balloon. Julia then painted her pinata and covered it with stickers. I punched holes in the sides of the pinata and threaded a piece of yarn through it.
Looks great, Julia!
Julia also decorated her cake. I frosted a cake with white frosting and gave Julia the cake and a tube of pink frosting (I refilled the tube several times before she was done). Julia had so much fun squeezing designs onto the cake and then spreading the frosting with a knife.
She was very proud of her creation and so was I! I think allowing the birthday girl to decorate her own cake is going to be a tradition in our family. It's fun, inexpensive, and relieves Mommy from the stress of trying to make the perfect cake-yippee!

For goody bags the girls used Do-A-Dots to decorate plain white bags.
Fun party!

Tuesday, April 14, 2009

Counting Nemos

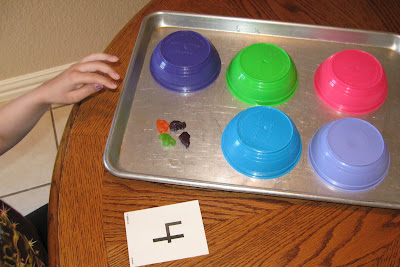
In preparation for an upcoming trip to the aquarium we have begun a study of ocean animals. The girls played a counting game using Finding Nemo fruit snacks. This game is a variation of "Hunt for It" in Developing Number Concepts Book 1: Counting, Comparing, and Pattern by Kathy Richardson. Developing Number Concepts is essential reading for anyone who teaches math to young children.

Materials:

  • Finding Nemo fruit snacks
  • six small bowls
  • tray or cookie sheet
  • paper bag
  • number cards

Preparation: Hide sets of Nemo fruit snacks under the bowls to match the numbers on the number cards. Place the number cards in the bag.
A child pulls a number card out of the bag and reads the number. She then lifts a bowl and counts to see if the number of fruit snacks matches the number on the card. The child continues to lift bowls and count until she finds the correct set.
The number cards I used have a numeral on one side and a set of pictures on the other. The children can read the number or they can count the pictures to determine how many fruit snacks to hunt for.

Monday, April 13, 2009

Butterflies

My friend, Liz, and I have been doing a preschool exchange for the past two years. On Tuesdays Liz's daughter, Abby, comes to our house for two hours of preschool and on Thursdays Julia goes to Liz's house. This arrangement has been wonderful! The girls love being together and they've learned so much.

Our preschool theme for March was life cycles. Here are some of the activities we did for butterfly life cycles.
After reading Butterfly Life Cycle by Jeff Bauer and From Caterpillar to Butterfly by Deborah Heiligman the kids put together these butterfly life cycle puzzles that I printed from Kelly's Kindergarten.
The girls practiced reading cvc words while putting the wings on the butterflies (another download from Kelly's Kindergarten).
For math the girls put together pattern block caterpillars and butterflies. The big girls used the black and white model and the pattern blocks to recreate the picture on the carpet.
I gave two year old Lauren the blocks that she would need and she placed the blocks directly on the colored model. I downloaded these from prekinders.com: b/w caterpillar, colored caterpillar, b/w butterfly, colored butterfly.
Liz made this great butterfly life cycle mobile with the girls.

Thursday, April 9, 2009

Toddler Eggs in a Basket

This version of the eggs in a basket counting game is designed for children who need practice counting up to three objects.

Materials:
mini Easter baskets
mini Easter eggs
egg counting cards (I used clip art to create mine on Power Point. Stickers on cards would work well too.)
The child counts the eggs on a card and then places that number of mini eggs in a basket. The child may choose to place the mini eggs directly on the card while counting.
I made cards with one, two, and three eggs for Lauren. You may want to make cards with more eggs for your child.

Wednesday, April 8, 2009

Easter Song Charts


The girls and I have been reading Easter songs on charts. I introduce each song and sing it to the children while using a pointer to follow the print. We reread the chart several times over the course of several days or weeks. As we read and reread the songs, the girls gain valuable insights into how print works. They learn that printed words match spoken words, that print is read left to right and top to bottom, and they gain knowledge of letters and sounds. Most importantly, we have fun reading together!

Lauren is completely confident that she can read our "Bunny" song all by herself. She is using our bunny pointer- an unsharpened pencil with a bunny eraser on the end.

Here she is reading Did Jesus Really Live Again?. This chart has much more print than I would usually use with young children but I used it because I want to emphasize the message of the song.

Here are the songs we are currently reading:


B-U-N-N-Y (author unknown)

I know a rabbit with long pink ears

And bunny is his name-o!

B-U-N-N-Y

B-U-N-N-Y

B-U-N-N-Y

And bunny is his name-o!


Did Jesus Really Live Again

by Mabel Jones Gabbot


Did Jesus really live again?

Yes, when the third day came

He wakened and he left the tomb

He called Mary's name.


Did Jesus come to those he loved?

Yes, people touched his feet

And of the fish and honeycomb

He did truly eat.


And there were nail prints in his hands

And a spear wound in his side.

Did Jesus really live again

After he had died!

Oh yes! And so shall I!

Monday, April 6, 2009

Easter Writing Station

Our writing station sits on a shelf near the table in the playroom. Providing a variety of interesting writing materials encourages Julia to explore writing. She loves to use the blank paper and envelopes to write letters to friends and family. Changing the materials occasionally keeps the writing station fresh and exciting.
The writing station holds various materials to encourage the girls to write. Books with blank pages, envelopes, blank paper, an letter/sound chart, a clipboard, and cards with family names are always available. Other materials change to reflect the current season or area of study. Here is a glimpse of what is currently in our writing station.
A letter/sound chart that I downloaded from Hubbard's Cupboard.
Family names written on cards.
A booklet of Easter words and pictures that I downloaded from Kidssoup. I would like to create another word booklet that reflects the spiritual meaning of Easter with words such as Jesus, tomb, resurrected, etc.
Here is Julia writing a flip book. This type of book is good for labeling pictures.

Here is Julia's completed flip book.
Here Julia is writing in a blank book. This type of book encourages Julia to write sentences or stories.